
Combines are important events for athletes to get noticed at the next level. Historically, combines are most common/popular for football and basketball – but many other sports are building combine testing into their camps and recruiting profiles. Putting on a combine comes with a lot of challenges… Let us make it easier for you!
Using Dashr equipment and software you can streamline athlete registration, performance testing, data collection/storage, and report generation. We are a one stop shop for these events and have been a pivotal part of dozens of testing organizations including all the Under Armour Next Gen, Football University, and ESPN Top 300 camps and combines as well as dozens of basketball camps (and other sports) across the country – so we have a bit of experience in having things flow nicely.
First you need to decide what drills and measurements you want to take. For basketball the common combines tests (outside of skills) we see are:
- ¾ Court Sprint with optional 10 yd Split
- Lane Agility
- T-Test
- Reactive Shuttle
- Vertical Jump
- Approach Vertical (Max vert)
Common body measurements taken include (manual measurements entered into the Dashr App or using our BioStation):
- Height
- Weight
- Reach
- Wingspan
- Hand Size
Which drills/measurements you choose to include will dictate what equipment you will need. Timed events will require timing gates, a ¾ court sprint with 10 split would be 3 gates where the Lane Agility or T-Test only require 1 gate each. Reactive Shuttle requires a timing gate along with React modules. Vertical and approach vertical jump can be done with our Jump system with a Vertec (sold separately)– or you can use a different jump measurement system and enter the results into the Dashr app.
So now you know what drills you want to run, and the necessary equipment (click on one above for info on what is required and how to operate it – here is a link to our Basketball Combine Package). How do you run a smooth combine? Follow these steps, and you will be good to go!
BEFORE TESTING DAY
1. Have a sign-up for athletes to participate.
Collect the names and info on your athletes. There are many ways to instigate sign-up, from sending out Google forms to dedicated software. It is best practice to have all of your athletes/participants signed up beforehand – but you have to plan on walk-ups as well. We discuss handling walk-ups later on.
2. Determine how much equipment and operators are needed.
The answer here is based on how many athletes you have and how fast you need to do testing. When done right we have tested 1,500 athletes in under 4 hours. The more athletes you have increases the required testing time. The more lanes/operators you have reduces testing time. Make sure you have an operator available for each station and a well-trained person to “float” from drill to drill as needed.
For groups that are putting on their first combines, a good rule of thumb is to plan for testing 60 athletes an hour per lane. As you get more proficient, 100+ athletes an hour per lane is fairly common.
Some ways to speed up testing:
- Taking height, weight, reach, etc. ahead of testing. Are the athletes there the day before as part of a camp? Is there any “down time” between registration and testing? On average we have seen the collection of height, weight, reach, wingspan, and hand size take nearly 3 min per athlete. Using our BioStation that time gets cut down to 40-60 sec. With all the other drills taking less than 30 sec each (instructions taking the bulk of this) – Bio can be a bottleneck.
- Utilize all your stations. Having everyone go through the combine in the same order is ideal, that way everyone has the same experience doing the same drills in the same order. This being said, if you need to speed up testing – statistics show that testing order (i.e. running the 60 before the broad jump or vice versa) does not impact athletic performance if the athletes are properly warmed up. So you can have them fill all the stations if you need to.
- Consistent instructions. Being consistent with your instructions for the athletes is important for both consistency and testing speed. Figure out what works for you and your athletes when telling them how to do the test – and present it the same way every time. Instructing the athletes take longer than them running the drill.
3. Test your equipment and make sure you know how to operate it.
If this is your first time using Dashr equipment or your system has been sitting in a closet for months – PLEASE take it out and get familiar with it prior to testing day. Preferably a week or two beforehand so if you are uncertain about anything, you can reach out for clarification before your event.
Also test the flow of data to make sure you are familiar with how everything operates. We have tried to make it as simple as possible, and there are a lot of online resources as well. I cannot tell you how many times we have gotten calls on Friday nights or Saturday mornings just before or during an event because the operator did not open up their case until the last minute. Please do not be this person!
4. Train operators.
Having knowledgeable operators has a huge impact on the success of your event. It is common for traveling combines to use local coaches that have not had experience using the Dashr system. If this is the case, make sure they know what they need to in order to operate the drill(s) they are assigned to.
Try to meet up with them before the event (days or hours before) and show them how to use the system. If you have their contact information, send them a link to the drill they will be operating so they are familiar with the drill/operation before having the system in hand.
Main job for the operator – Check in the athlete by pressing the keyboard at the top right, enter in their number, confirm that their name pops up, instruct them on how to do the test (if necessary), run the drill and save the data. Pro tip – turn on “QuickScan” in the settings and the prompt to enter in a BadgeID will pop up automatically after a test is completed.
It is also beneficial to show them how to get into the app, select their drill, and connect the devices if they were to close out of the app at some point. We suggest that you have someone confident in using the system floats around from station to station to answer any questions/fix set-ups if necessary. This will likely prevent a little confusion turning into a major disruption.
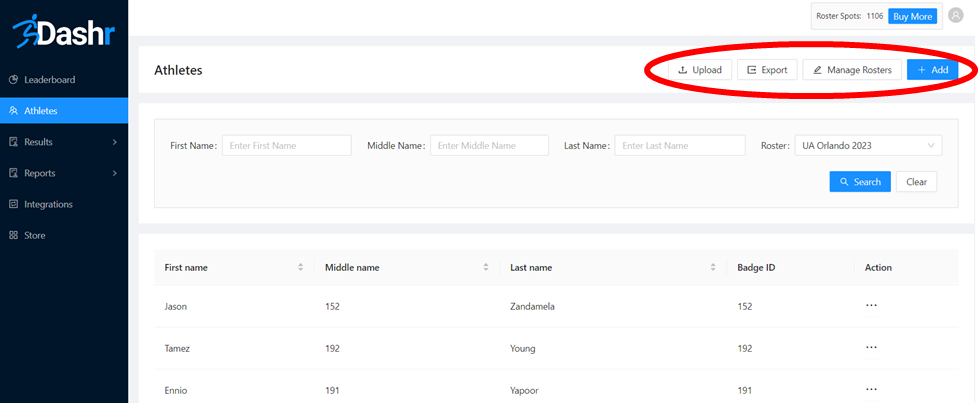
5. Create a roster on the Dashr Dashboard.
Go to your Dashr account online (link), if you do not have an account yet – create one, it does not cost anything. Once logged in, go to the “Athletes” tab on the right and create a roster by clicking “Manage Rosters” at the top right and pressing the “+ Add” button that slides out from the right. Give your roster a name, for example “UA Orlando 2023” being my roster for the Under Armour combine in Orlando in 2023. Now I can add athletes to that roster.
6. Add athletes to the roster.
Once you have your “final” (keep in mind there is nearly always some walk-ups or late additions) list of athletes go ahead and add them to your account. To do this, log into our Dashboard, go to the “Athletes” tab on the right and press the “Upload” button at the top right (note that the “+Add” button allows you to add one athlete at a time, upload allows you do get them in all at once).
Now you will want to download the template and copy over all your athletes. First, middle, and last names are required – if you do not have a middle name you can put an “X” or give them a number. Most combines use their BadgeID here (more on that shortly). There are a number of other fields available for upload – such as email, height, weight, graduation year, DOB, etc. Include as much information as you would like. If you are including their sport and position, download our “Sports and Positions” file (just below the template) for guidance on how to spell/abbreviate that info.
IMPORTANT – You will want to assign each athlete a BadgeID (in column Q of the template). This is the number that you assign the athlete to quickly find them on the Dashr App when testing.
Check out our Dashboard Instructions online for more detailed information on the operating the Dashboard along with several short videos.
7. Give your athletes their BadgeID.
When your athletes show up, you are going to give them their “Number” aka their BadgeID. They will then present this number at each testing station. To help them remember their number we suggest giving them something to wear that has the number on it. This could be a bib pinned to their shirt, writing on their hand with a marker, a sticker, etc… but what is most popular is a branded silicon wristband. For minimal cost you can give each athlete a band with your logo/info on it and write their number with a permanent marker on the other side.
TESTING DAY
1. Set-up your check-in station.
Here you will check-in the athlete for your records – get whatever information you need from them and share with them their “Number”. Most efficient way to do this is to have a laptop (tablet if a laptop is not available) logged into your Dashboard account. On the “Athletes” tab you can filter by roster – drop down menu near the top right of the page. Select your roster and press search. Or you can have a print-out of their names and BadgeIDs – then search the list.
Now as an athlete comes up, search their name and it will show you their BadgeID aka “Number” to the right of their name. If for some reason they do not have a BadgeID you can add one by clicking on their name and scrolling down to where you can add one. Write this number on the band (or whatever you are using) and give it to the athlete.
2. Dealing with walk-ups.
If an athlete shows up that is not on the roster, you will need to add them – this is why it is nice to have the laptop. To do this you want to make sure you know what your highest BadgeID is and give them a BadgeID that is higher than it. If you assign them a BadgeID that is already being used – it will remove it from the original athlete and they will no longer have a BadgeID. This could result in you ending up with both athlete’s data being saved under the same name.
To add the athlete, press the blue “+ Add” button at the top right of the “Athlete” page. Here you can type in their information. Make sure you do name, BadgeID, and Roster – clicking on the Roster(s) field will give you a list of your rosters to quickly select from.
Write the walk-up athlete’s “Number” on a band and send them along.
Note: When you enter into a drill, the app pulls the most recent roster. If a walk-up gives their number to an operator and the app does not recognize the number, it will automatically update the roster. If an athlete from a previous testing event had the walk-ups number – then the previous athlete’s name will show up when the number is entered. To fix this, go to settings and press the “Refresh Roster” button at the top right. You can avoid this entirely if you select the roster on the connection page, then athletes from other rosters/events will be ignored.
3. Set-up your drills.
Hopefully your drills have been set-up or are actively being set-up while check-in is happening. Follow our instructions online for our suggested set-up and operation of each drill – since you set them up and tested them earlier, this should be a breeze.
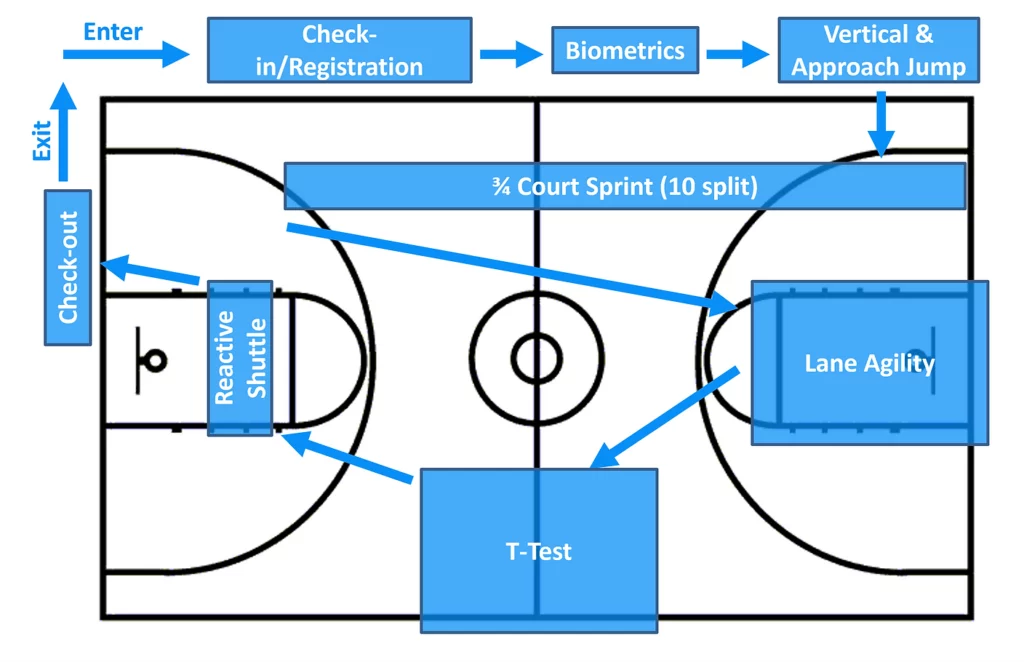
Here is a common layout for drills for a basketball combine but do what makes sense for you and your testing location.
4. Warm-ups.
After check-in and before testing you will want to get your athletes warmed up! Most every coach has their own recipe for this – so we won’t tell you how to do it, but make sure you do!
5. Start testing!
This is the fun part! Get your athletes moving through your testing stations. See drill links above for drill/system operation. You will see results showing up on the Dashboard.
6. Check-out.
Not every event has a check-out station (it could be revisiting the check-in station) but it is good practice to have one. Have the Dashboard open and have the athlete share their name as they finish up. Search for them in the Athletes tab, click on them and make sure all their biometrics were captured. Then go to the Results tab and search their name again, make sure they have completed all of the tests.
If for some reason they skipped a drill (on purpose or not) you can choose to send them back to it. Or if for some reason a result was missed – you can catch it here before they leave and re-measure.
If you are using Epley Advantage Performance Index reports, you can print them out and send the athlete home with a report.
Equipment and Software
We have put together a package for baseball combine testing. It includes everything for testing all the drills listed here.
Each athlete requires a Roster Spot to follow these steps and have the data saved and stored electronically. 500 Roster Spots are included in our Basketball Combine Package, more can be purchased through our Dashboard, on our website, or through one of our distributors. Roster Spots are OPTIONAL when using the Dashr system, but without them you would need to write down results manually. The instructions outlined here are assuming you have Roster Spots. You will want to make sure you have enough for the athletes you expect to show up, along with a buffer for walk-up. When you purchase Roster Spots directly from the Dashboard they are automatically credited to your account without delay.