
Create a Dashr account through our Dashboard then download the Dashr App from your app store to your Android (API 21 or newer) or iOS (version 10.0 or newer) compatible device (not included with the purchase of a Dashr system).
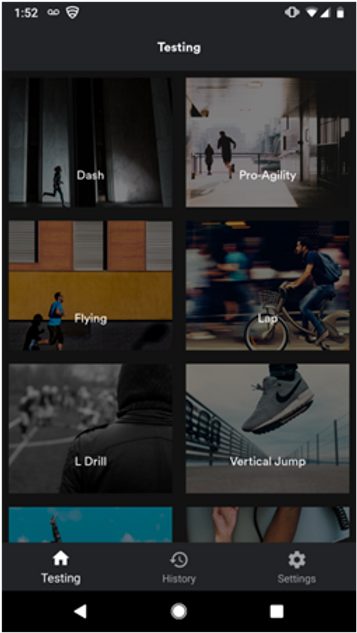
Once logged into the app, you will see tiles containing the classic timing drills that the system offers – Dash, Flying, Pro-Agility (5-10-5 shuttle), Lap, and L-Drill (3-cone drill, also used for T-Test) – as well as Reactive Agility, Vertical Jump, Broad Jump, Biometrics, Barcode and RFID (check-in tiles) which are discussed in different threads.
Any timing gate can be used for a start, stop, or split for any timing drill on the app. You would likely just want to adjust what size tripod the gate uses, depending on the starting method. 3-point and block starts typically use the mini tripods so that the gate is just a few inches off the ground and the athlete’s hand is in the beam – static dash start. The regular sized tripods have extendable legs, and are typically set to around waist height – used for splits/stops on dash as well as flying starts and the Pro-Agility/L-Drill.
Once you have selected your drill, you will see a connection page where you will have the option to connect the Dashr 2.0 equipment to the app. Note that all Bluetooth connections are performed through the app, not through your device’s operating system (like most devices). The laser modules broadcast a connect signal the first 3 seconds that they are on. To connect, start by having them powered OFF. Turn ON the laser module you are wanting to connect and then quickly press the lighting bolt symbol next to the respective location (start, split, or stop). If successful, you will see a blue check mark appear where the lightning bolt used to be. Repeat this for each remaining laser module.
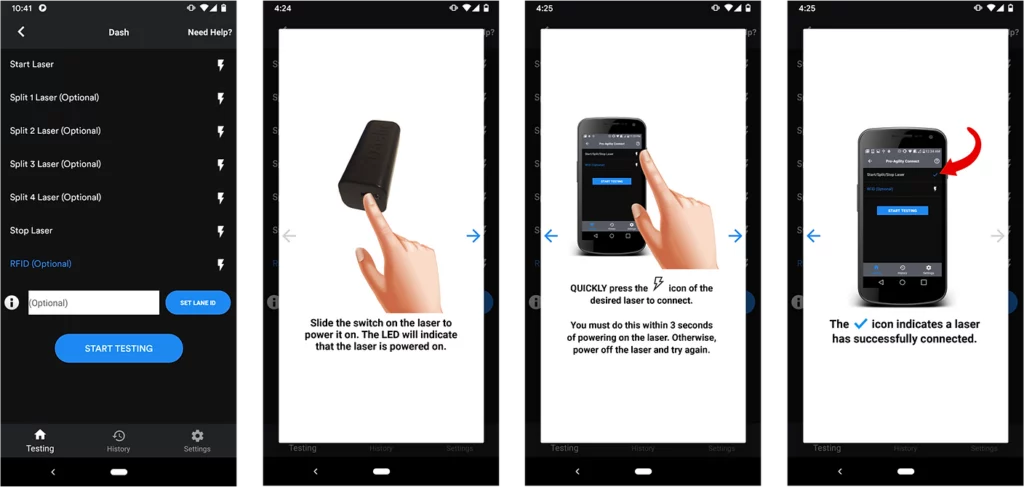
When you connect a split or stop laser, you will be asked to select a split distance. This is purely for data saving and organizational purposes, so they will not be constrained to those distances and the units are arbitrary.
If you are using our RFID system, you will connect your RFID module now – the same way as you connected the laser modules.
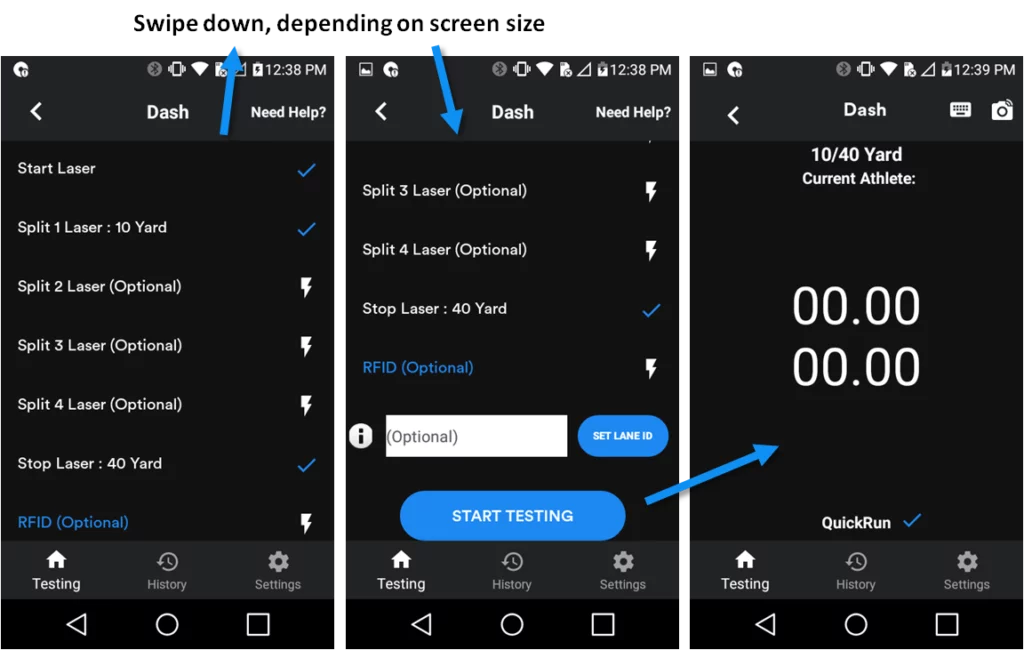
The “Set Lane ID” field/button on this page is optional and allows you to identify your lane. For instance, you may have four Pro-Agility drills set-up at once, and you would like your saved results to indicate which station the athlete performed the test. Another example: For hockey you might test the 10 yard dash on turf, on ice/skate, forward/backward, with and without a puck. You can identify each of those by assigning them a number. Note that this functionality is currently only available through the Android version of the app, an iOS update is coming soon.
Once everything is connected, press the blue “Start Testing” button to go to the testing page. Before running any athletes through, at a few seconds to do a test run – to ensure everything is operating properly.
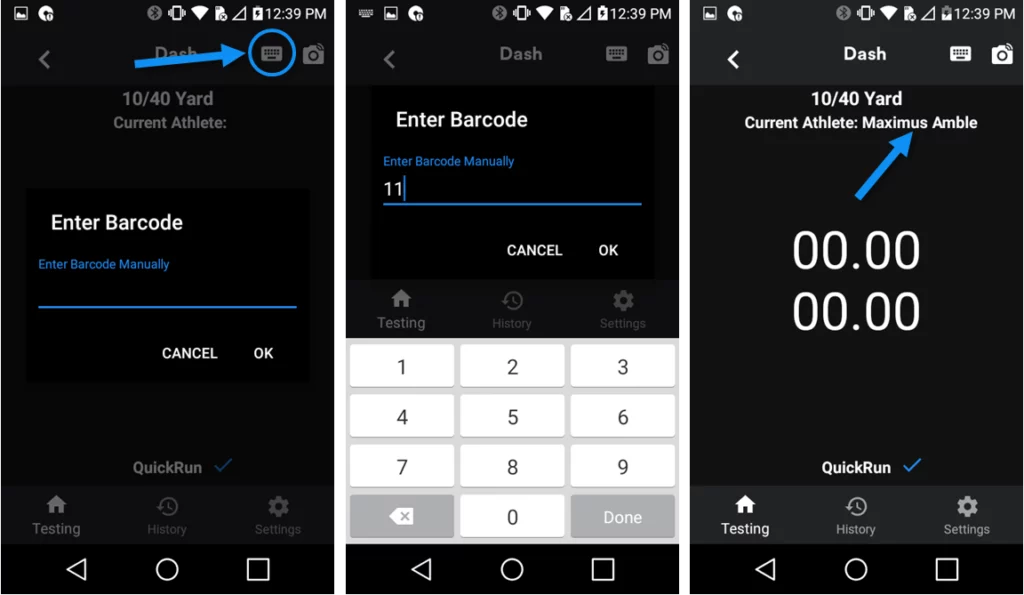
After your quick test, check-in your first athlete If you are using our Roster software/equipment (athlete selection, numeric entry, barcode, or RFID). There is much more information on this on the Rosters page within our website and the What is Dashr Roster and AutoID Technology?. This is optional, you can run the drill without an athlete checked-in – but if you want to have the data automatically recorded an athlete needs to be checked-in. For numeric entry, hit the keyboard button at the top right of the screen (drop down menu for iOS) and enter in that athlete’s Badge ID (unique numeric identifier).
When you are ready to test (with or without an athlete checked in), block the starting gate for about 3 seconds and you will get a “GO!” message – flys do not require this 3 second block and you will not get a “GO!” message as the timer starts as soon as the first gate is entered. This is an indicator that the system is ready. When the athlete leaves the gate the 0:00 will turn blue, when they cross a gate it will return a number. When they cross the finish it will give the final number and the option to accept or reject the time (in case the test was performed improperly). If you are on WiFi or network service, accepted results will be saved to your account for viewing/sorting/exporting on our Dashboard. If you do not have a network connection, results will be saved locally on the device and once back on network you can upload the results from the History tab in the app. Note that uninstalling the app or clearing the cashe will delete locally stored data.
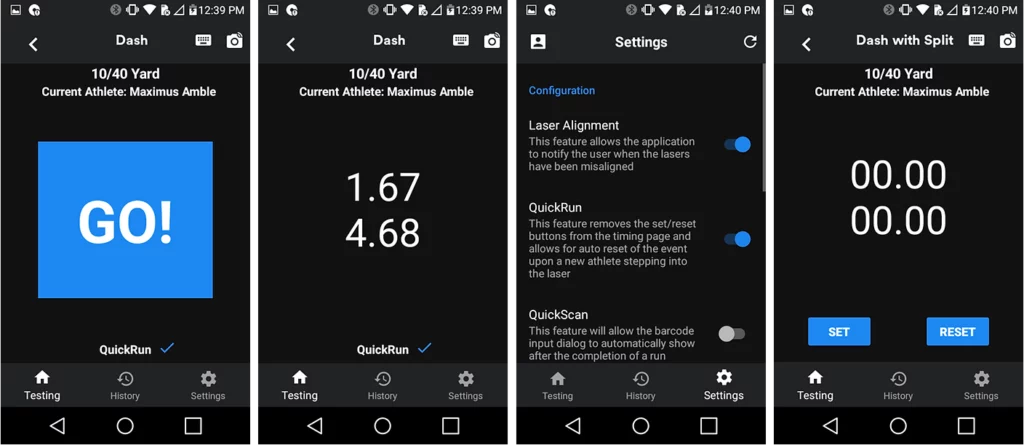
With QuickRun on, just have the next athlete enter the start gate and the system will reset. Next athlete up!!
To turn QuickRun on or off, go to the settings tab at the bottom right. Turning QuickRun off will get you “SET” and “RESET” buttons, giving you more control over testing – but making it less automated. We suggest turning it off when testing poorly disciplined/inexperienced athletes that teeter in and out of the start gate. This way the drill starts when you want it to, and results are cleared once you are ready.
In the settings tab there are a number of features that you can turn on or off.
- Laser Alignment throws an error on the testing page if one of the split or stop lasers are not hitting a reflector. This could be because they were bumped and no longer aligned, or perhaps someone walked/ran through the gate before it was ready. This is meant to inform you, as the operator, if there is an issue with a downfield gate without having to constantly check them.
- QuickRun allows for more automated testing, when the start laser is entered, the system is reset and ready to test again. Having it off, gives the ability to set and reset from the app.
- QuickScan is useful when you are testing multiple athletes while using numeric entry. The field allowing you to enter in the athlete’s Badge ID automatically pops up after a test is completed.
- Instantly Push Data does just that, results will be automatically saved to the online Dashboard when on network. Turn this off if you would like them all to be stored locally instead, or if you are testing off network.
- The icon at the top left takes you to your profile where you can see how many remaining Roster Spots you have left. You also have the ability to logout of the app here.
- The circular arrow at the top right is a sync button, pressing this while on network will update the roster on your device – if it was changed (athletes added or assigned Badge IDs) on a different device or the Dashboard. Note that this sync will also take place if you enter in a Badge ID/barcode/RFID that the system does not recognize.
Check out the set-up page for additional videos and drill specifics!
Important things to note:
- DO NOT PLACE YOUR PHONE/TABLET ON THE GROUND WHEN TESTING. This will block the Bluetooth antenna on your device and limit the range of the system.
- During that first 3 seconds of powering up the LED on the laser module gives an indication of battery life. If it turns yellow or red, make sure you change your batteries. If it is green, you should be good to go!
- The 3 second broadcast time is built in to limit connection of laser modules being used for different drills. For instance, you may be setting up 2 lanes of the 40 yard dash, if they are being connected at the same time you might accidentally and unknowingly connect a laser being used for the finish at the start. Therefore, only connect one laser module at a time.
- If you are adding in splits as well, make sure you connect them in order. If you connect the “Split 2” without connecting “Split 1” the system will not function properly.