Biometric Measurements

Speed, agility, jump, etc. measurements are key, but knowing the size of the athlete helps complete the picture. Whenever you are testing, you should at least know the height and weight of each athlete.

Biometrics demo.

Drill Instructions

Height, Reach, and Wingspan – Physical Set-up

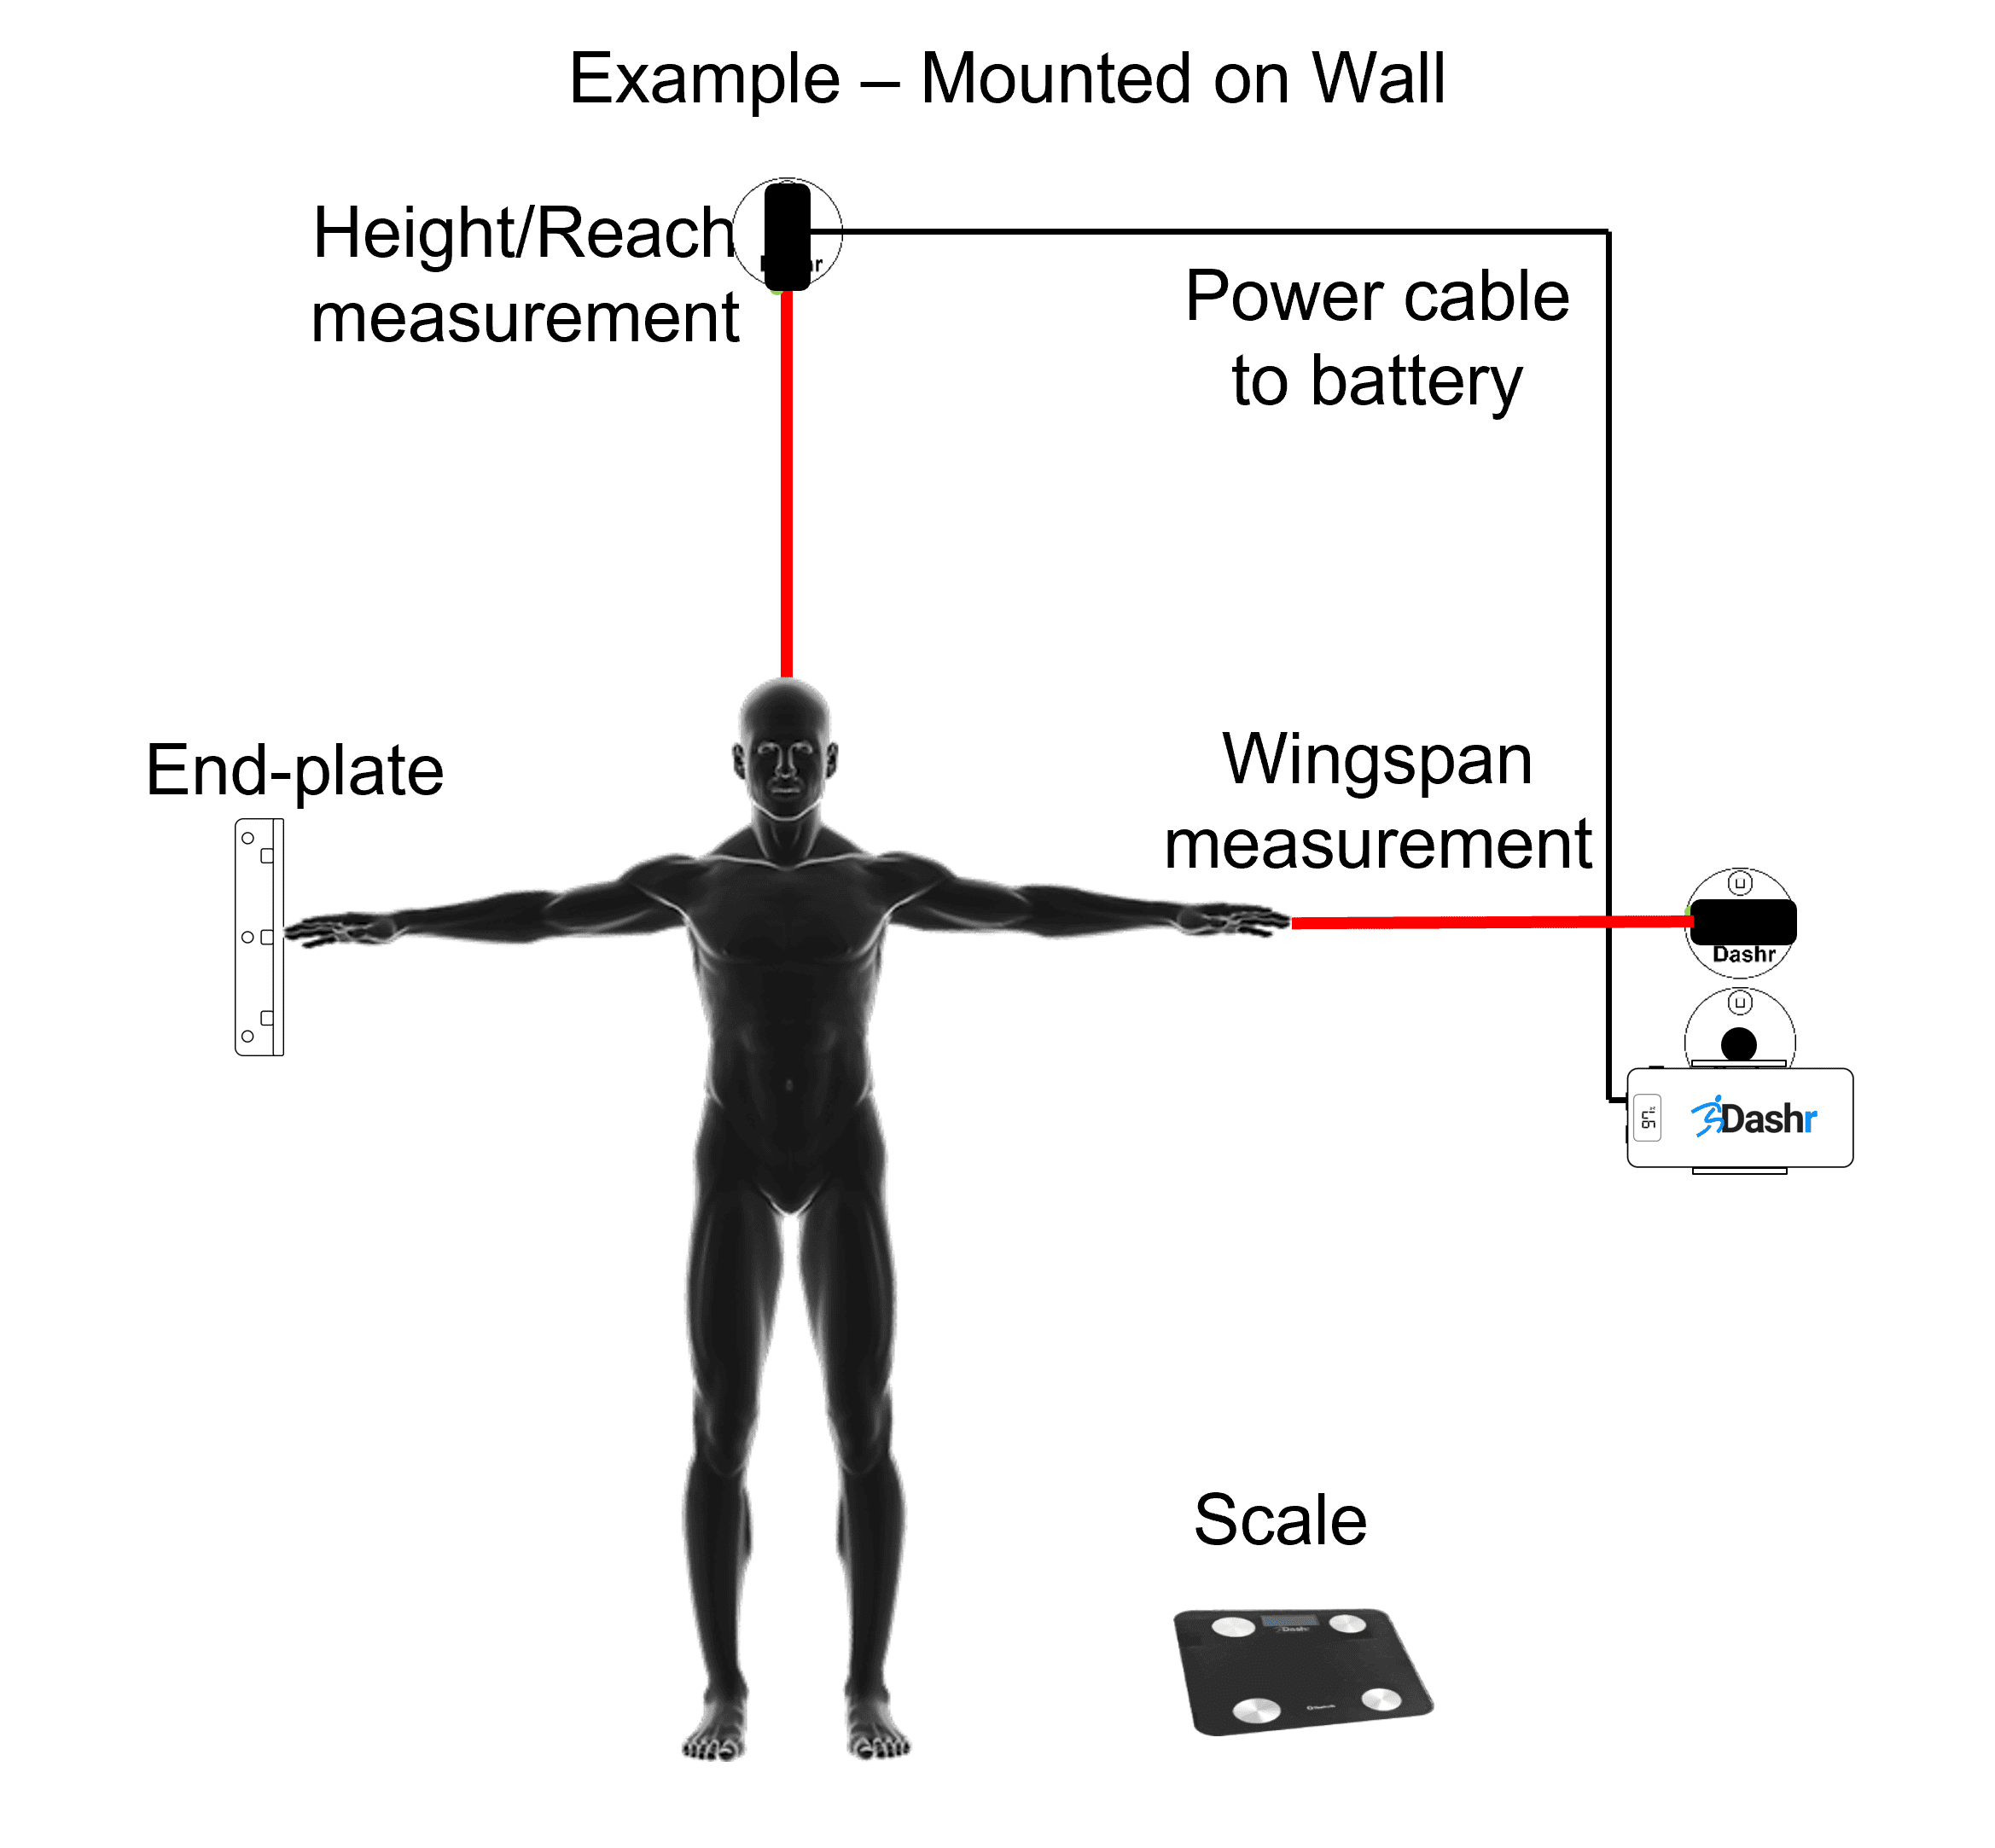
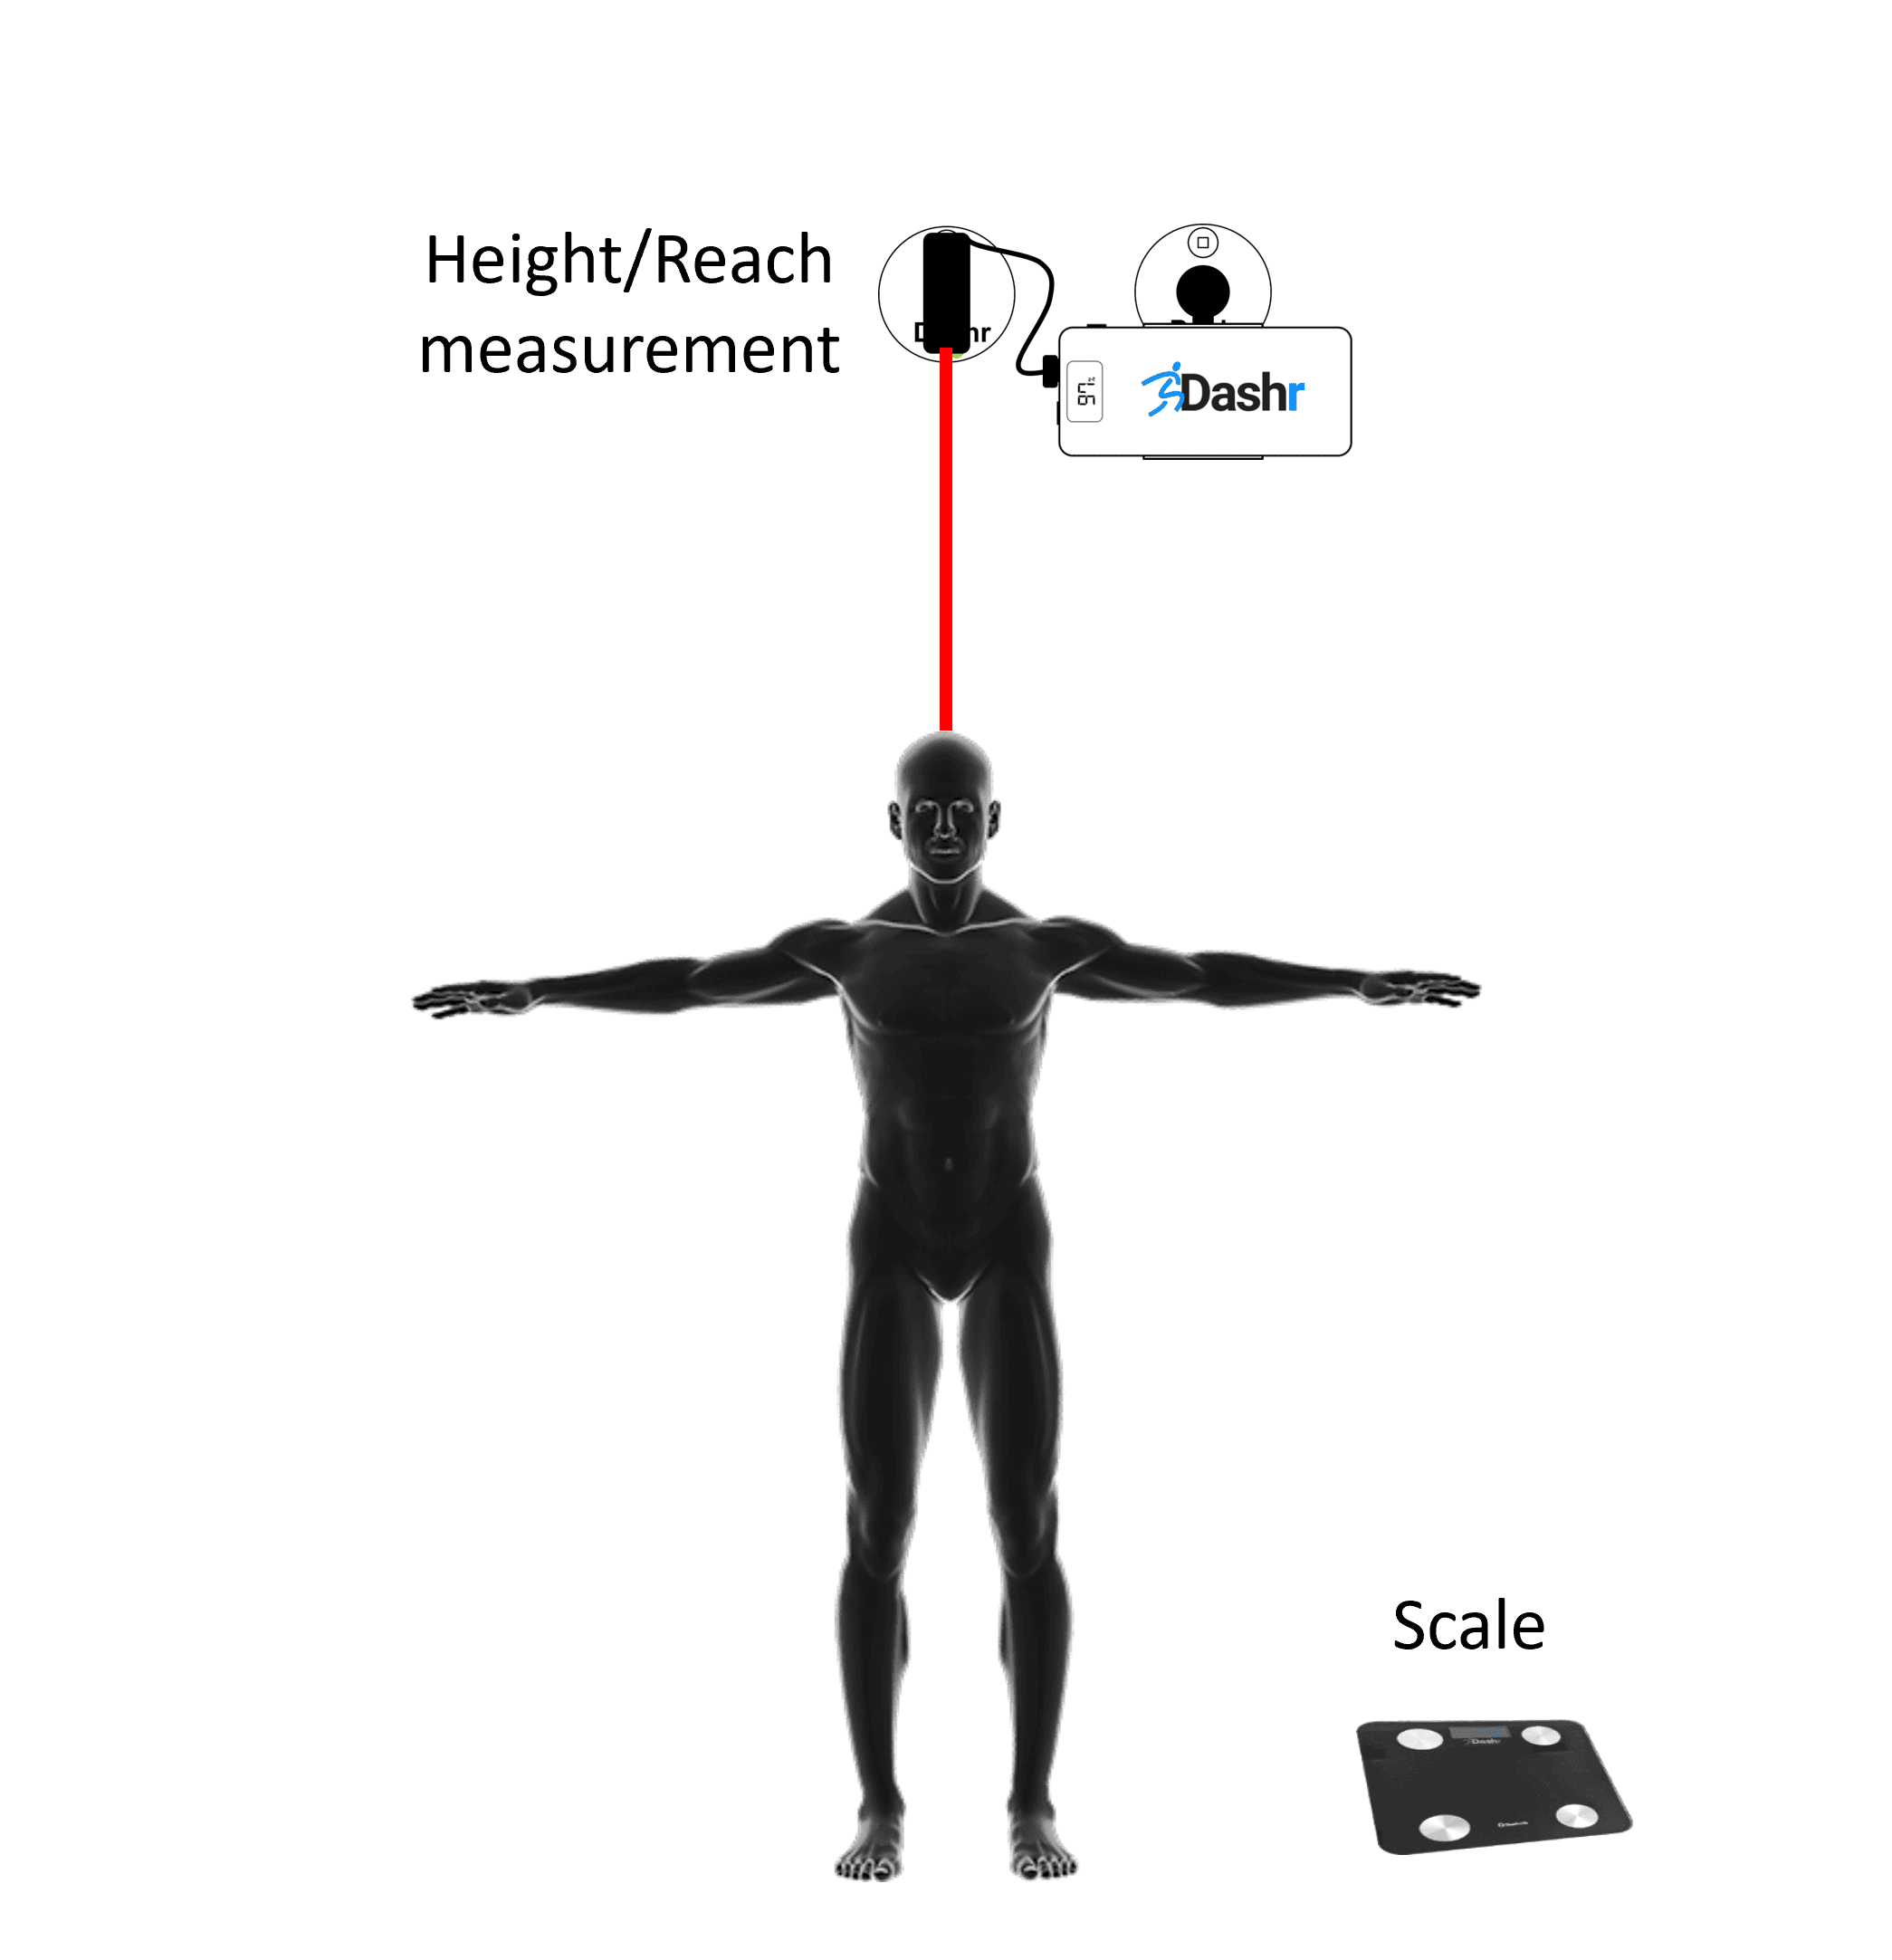
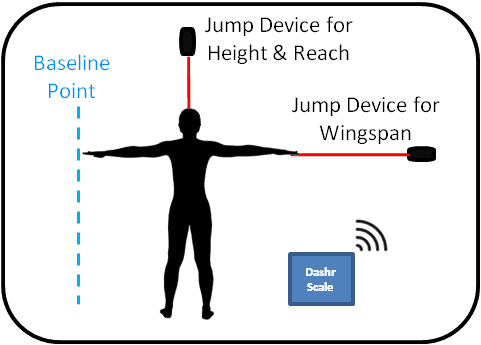
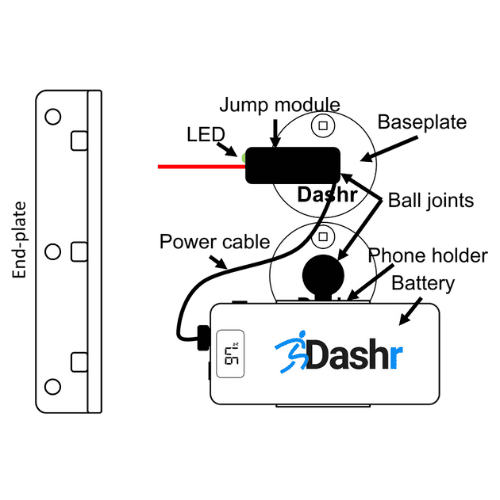
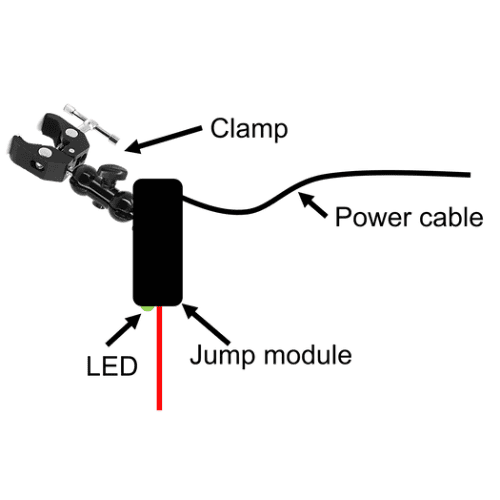
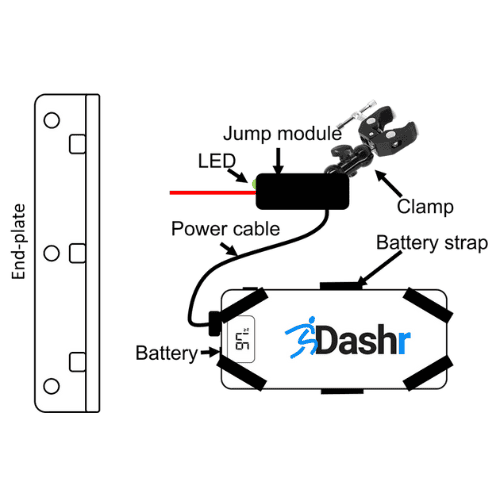
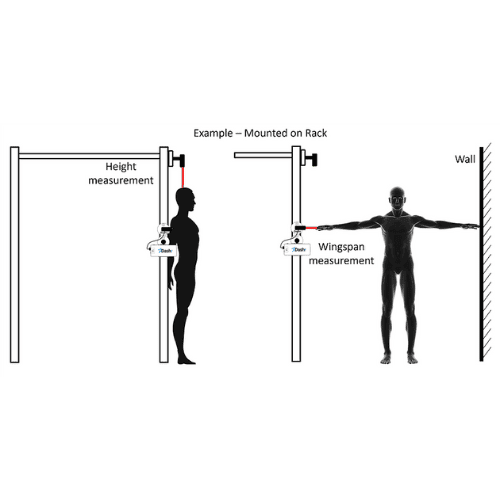
Please view the installation instructions that are relevant to you, either Wall Installation, Frame Installation, or Rack Installation.
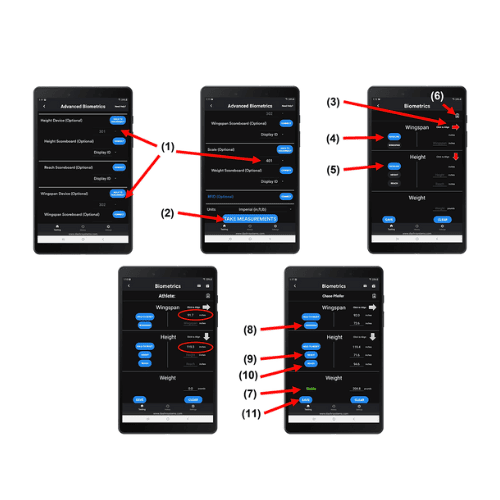
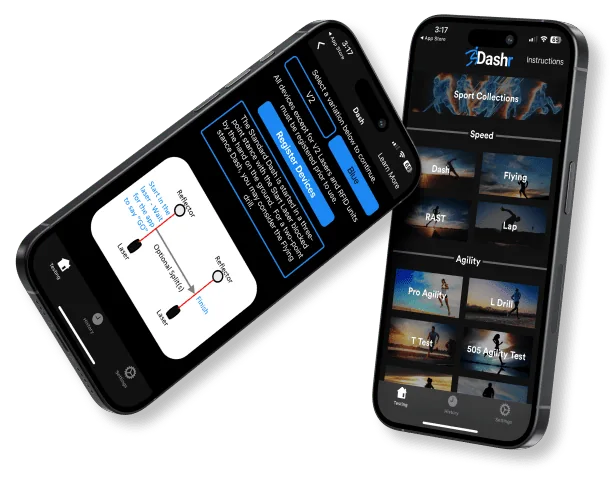
Wall Installation

  • If you have a designated space on a wall, this is the suggested installation method.
  • Height and reach are measured using a single Jump module. The device measures the distance to the ground as a baseline, then to the athlete’s head (height), and fingertips (reach).
  • Install the Jump module higher than any expected measurement, this might be 7-8 ft above the ground for height or 10-12 ft if you are also doing reach.
  • To do this, you will need to stick the square baseplate to the wall at the height of your choosing. If the ball joint is not already on the baseplate, use the included hardware and screw on the ball joint.
  • Make sure the wall surface is clean and dry before using the command strips to attach the baseplate. Stick the baseplate to the wall. Note that if you need to remove/move the baseplate, you can remove the command strips and add new ones for another install.
  • Attach the Jump module to the ball joint by screwing them together. Loosen the ball joint to orient the Jump module so that the LED is pointing towards the ground – then gently tighten up the ball joint.
  • Connect the power cable to the Jump module along with the USB extension cable. Later this will be plugged into your battery.
  • Wingspan measurement is the same concept as height/reach – just turned on it’s side. On one side you will mount your Jump module, the other you will mount an end-plate (acts as the ground in the height/reach orientation).
  • Map out where you are going to install the wingspan Jump module and the end-plate. The distance between them should be wider than any expected wingspan measurement (depending on the group of athletes, this could be as wide as 8 ft). The distance the Jump module is off the ground should be around average shoulder height for your athletes.
  • Similar to the square baseplate used for the height/reach Jump module, there is a rectangular baseplate for wingspan that includes two ball joint. If the ball joints are not installed, do that now.
  • Make sure the surface is clean and dry before using the command strips to attach the baseplate. Stick the baseplate to the wall (suggested vertical orientation). Note that if you need to remove/move the baseplate, you can remove the command strips and add new ones for another install.
  • The end-plate is a longer piece of acrylic, attach it to the wall opposite the wingspan Jump module using the command strips.
  • Back at the wingspan baseplate, attach a Jump module to the top ball joint and orient it so that the LED side is pointed towards the end-plate. Gently tighten the ball joint.
  • Connect the included phone holder to the the bottom ball joint, and orient it so that the phone holder is below the baseplate and opens away from the wall. This is where you will put the Dashr battery, do that now.
  • Connect the power cable to the wingspan Jump module. Plug this cable into one of the USB ports on the Dashr battery. Locate the USB cord from the height/reach Jump module and connect that to the other USB port. NOTE – You can also plug these into the wall if you have an outlet available and USB plugs.
  • Finally, clean up the hanging cable by using the cable management mounts included (squares that stick to the wall with zip-ties to hold the cable). Route the cable how you see fit.

Frame Installation

  • If you travel with this set-up or break it down often, this is the suggested installation method. FRAME IS NOT INCLUDED, COMPONENTS TO ATTACH TO A FRAME ARE INCLUDED (frame option from Amazon).
  • Height and reach is measured using a single Jump module. The device measures the distance to the ground as a baseline, then to the athlete’s head (height), and fingertips (reach).
  • Install the Jump module higher than any expected measurement, this might be 7-8 ft above the ground for height or 10-12 ft if you are also doing reach. So make sure you get an appropriately sized frame.
  • To attach the Jump module, screw it onto a clamp that has an adjustable arm.
  • Select a location on the top crossbar of the frame and use the clamp to grab onto the frame. Connect it so that the arm sticks straight out from the frame and orient the LED of the Jump module down towards the ground.
  • Connect the power cable to the Jump module along with the USB extension cable. Later this will be plugged into your battery.
  • Wingspan measurement is the same concept as height/reach – just turned on it’s side. On one side you will mount your Jump module, the other you will mount an end-plate (acts as the ground in the height/reach orientation).
  • To attach the wingspan Jump module (there is no difference in the height/reach Jump module and the wingspan module, wingspan is used here to differentiate the two within our instructions) first screw it onto a clamp that has an adjustable arm.
  • The distance between the wingspan Jump module and the end-plate should be wider than any expected wingspan measurement (depending on the group of athletes, this could be as wide as 8 ft). The distance this Jump module is off the ground should be around average shoulder height for your athletes.
  • Select a location on a vertical support of the frame and use the clamp to grab onto the frame. Connect it so that the arm sticks straight out from the frame and orient the LED of the Jump module horizontal towards the other side of the frame.
  • The end-plate is a longer piece of acrylic, attach it to the vertical support opposite the wingspan Jump module. To do this you will need to use the clamp provided without an adjustable arm and the included hardware (1/4-20 bolt). Attach it so that the end-plate is vertical and acts like the ground in the height/reach set-up.
  • Use a supplied battery strap to attach the battery to the frame near the wingspan Jump module.
  • Connect the power cable to the wingspan Jump module. Plug this cable into one of the USB ports on the Dashr battery. Locate the USB cord from the height/reach Jump module and connect that to the other USB port.
  • Finally, clean up the hanging cable by using the zip-ties included, or hang them on the back side of the frame if you have a banner/covering on it. Route the cable how you see fit.

Rack Installation

  • If you plan on setting this up in your weight room and you do not have a designated space, this is a possible installation method. RACK IS NOT INCLUDED, COMPONENTS TO ATTACH TO ONE ARE INCLUDED.
  • With the mounting hardware included you can get pretty creative with your space. The baseplates used for wall mounting also have holes cut in them to attach to a rack using the carriage bolts, washers, and wingnuts provided. The adjustable clamps used for frame mounting can also be used with your rack, depending on the size of the square tubing. The height measurement could also connect with that clamp to the crossbar/pull-up bar – so you can get creative.
  • Please check out the instructions for wall and frame mounting for ideas/concepts for your unique installation. Please feel free to contact us via phone or email to discuss options as well.
  • Note that you may not be able to measure reach when using a rack as the base for your installation. If the athlete can reach the height/reach Jump module while standing, it is not high enough.

Operating the BioStation in the App

  • Depending on your purchase you will have receive one or more Jump modules (with all the components for vertical/broad jump measurement), a scale, and additional mounting hardware.
  • Install/open the Dashr app on your phone or tablet. (Create an account here if you have not already)
  • Register your Jump device(s) in the app – Navigate to the “Device Registration” button at the bottom, power on the Jump device and select it from the “Available” list and assign it a number. Write that number on your device. (This only has to be done the first time you use the Jump module with this phone/tablet) NOTE – you can toggle the units on the scale (lb/kg) with the button on the bottom of the scale.
  • Register your scale in the app – Make sure the scale has AAA batteries in it (included) and turn it on by stepping on it. Select it from the “Available” list and assign it a number. Write that number on your device. (This only has to be done the first time you use the scale with this phone/tablet)

  • Return to the home menu and select Biometrics, then Device Assisted.
  • (1) With the Jump module(s) on, select the number you assigned the one used for height/reach (in registration) from the drop-down menu and press the “Connect” button. If it does not work the first time, repeat. Do the same for the wingspan Jump module and the scale.
  • (2) Once all devices are connected, press the “Take Measurements” button.
  • (3) Use the align toggles (arrows) to make sure the height/reach Jump module laser is shooting straight down at the ground. Adjust the arm as necessary (loosen then tighten the knob on the side) if it needs to be realigned. Do the same thing for wingspan, make sure the Jump module laser is shooting horizontally to the end-plate or wall/surface of your choosing. Adjust the arm as necessary (loosen then tighten the knob on the side) if it needs to be realigned.
  • (4) Calibrate the wingspan measurement by placing the clipboard on the end-plate, where the laser hits it (use the alignment toggle if necessary), and press “Calibrate”. This will measure the distance the device is from the end-plate.
  • (5) Calibrate the height/reach measurement by placing the clipboard on the ground, under the laser (use the alignment toggle if necessary), and press “Ground Height”. This will measure the distance the device is from the ground. Note that using the clipboard as part of calibration takes the thickness of the clipboard (~1/8 in) out of the final measurement, increasing accuracy.
  • (6) Check in the appropriate athlete (details here) – optional but STRONGLY suggested for this drill or else you will need to copy down all the measurements.
  • (7) Have the athlete take off their shoes and stand on the scale, a message will appear saying “Stable” when an accurate measurement is recorded. Note – The scale needs to be placed on a solid surface, do not use on grass or turf. If you are testing on a track, lay down a board to create a rigid platform.
  • (8) If measuring wingspan, have the athlete reach out wide with one set of fingertips on the end-plate (or wall/other baseline object) and the other fingertips stretched out towards the wingspan Jump module. Place the clipboard on his/her fingertips and press the “Measure Wingspan” button.
  • (9) For measuring height, have the athlete stand directly under the height/reach Jump module (shoes off) and place the clipboard on his/her head. Press the “Measure Height” button and their height will show up on the screen, Note – If the height measurement is less than what you expect, make sure they are directly under the laser and not hitting their shoulder.
  • (10) If measuring reach, have the athlete take a half step to the side and reach up as high as they can to the height/reach Jump module. Place the clipboard on his/her fingertips and press the “Measure Reach” button. Note – You may need a box or something to stand on in order to get the clipboard on top of the fingers, depending on the size of the athlete.
  • (11) Once all measurements are collected, hit the “Save” button to save it.
  • Repeat Steps 6-11 for each athlete you test, this should take about 40 sec per athlete.